How to Ventilate a Grow Tent Correctly
Heat spikes rarely come from one bad component. In most grow tents, the real problem is that airflow, static pressure, intake air, and equipment load were never matched as a system. If you want to know how to ventilate a grow tent correctly, start there. A tent with great lighting and poor air exchange will still run hot, hold excess humidity, stress plants, and create odor control problems.
Grow tent ventilation is not just about hanging an inline fan and hoping the temperature drops. You are balancing sensible heat from lighting and equipment, moisture released through transpiration, negative pressure for odor containment, and enough fresh air to keep the canopy supplied with CO2. The right setup depends on tent size, room conditions outside the tent, duct length, carbon filter resistance, and whether you are running high-intensity lights or cooler LED fixtures.
How to ventilate a grow tent as a system
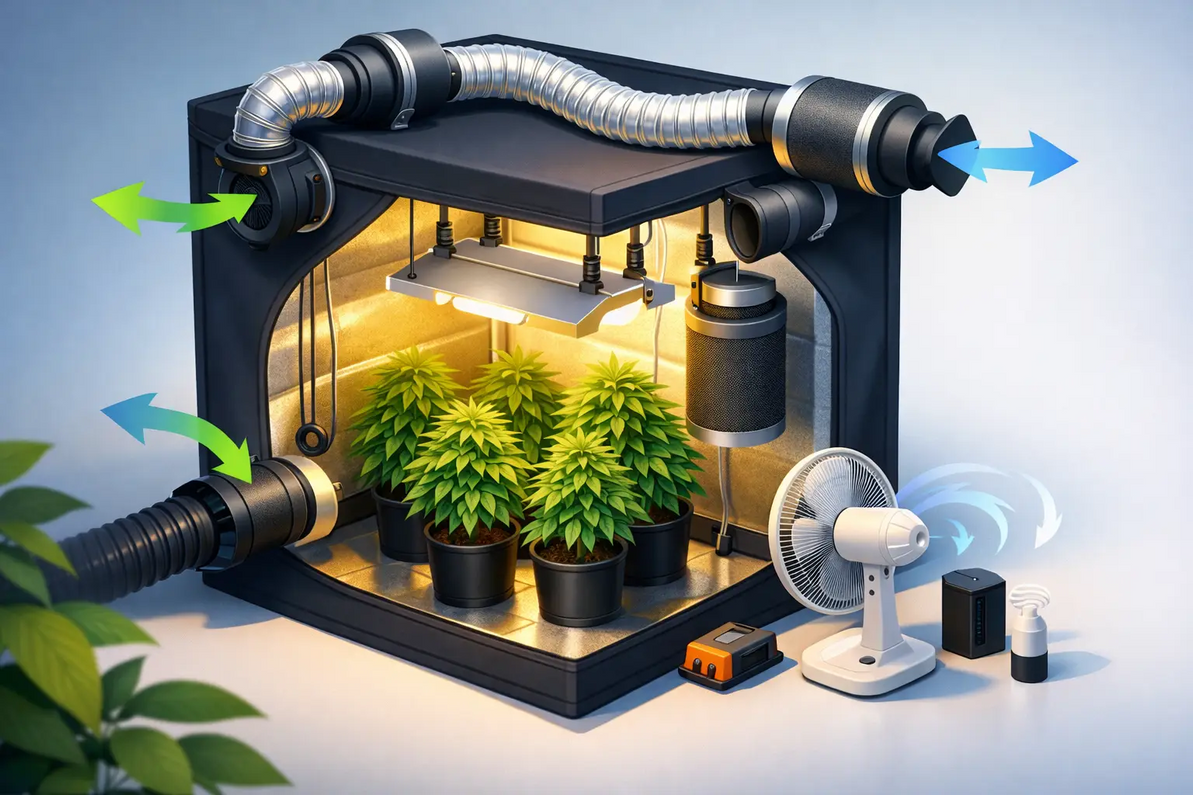
A grow tent should move air in three ways at the same time. First, it needs air exchange through an exhaust fan that removes heat, humidity, and stale air. Second, it needs intake air, either passive or powered, to replace what the exhaust fan removes. Third, it needs internal circulation to keep air moving across the canopy and eliminate stagnant pockets.
Those three functions get confused all the time. Internal clip fans do not replace exhaust. An oversized exhaust fan does not fix poor duct routing. And adding more fan speed without enough intake opening often creates noise and weak actual airflow because the system is starved for replacement air.
For most small to mid-size tents, the exhaust fan is the primary driver. It should typically be mounted high, because heat accumulates near the top of the enclosure. Intake openings belong low on the tent where cooler replacement air can enter. That gives you a cleaner bottom-to-top airflow path across the crop.
Start with volume, then account for resistance
Tent volume is your baseline. Multiply length x width x height to get cubic feet. A 4 x 4 x 7 tent contains 112 cubic feet. If air were moving in ideal conditions, one air exchange per minute would suggest around 112 CFM.
Real systems are not ideal. Carbon filters, duct bends, long duct runs, reducers, mufflers, and bug screens all add static pressure. Lighting systems and dehumidification loads also push required airflow higher. That means a fan selected only on tent volume is often undersized once installed.
A practical rule is to calculate tent volume, then increase the target airflow to account for losses and heat load. For many hobby and specialty cultivation tents, that means adding 25 to 50 percent for a short, simple run, and more if you have a carbon filter and multiple bends. In a 4 x 4 tent, the working fan requirement may land closer to 150 to 250 CFM instead of the bare 112 CFM volume number.
This is where engineering matters. Fan ratings published at free air do not tell the whole story. What matters is delivered airflow at the static pressure your system actually creates.
Exhaust fan sizing and placement
The most common grow tent exhaust fan sizes are 4-inch, 6-inch, and 8-inch inline models. Small tents with efficient LED lighting may perform well with a quality 4-inch unit. A 4 x 4 or 5 x 5 tent often needs a 6-inch fan, especially when paired with a carbon filter. Larger tents, hotter rooms, or systems with longer duct runs may justify an 8-inch fan with speed control.
Placement should be as high as possible in the tent. Hot, humid air naturally collects at the top, so extracting there is more effective than trying to pull from the middle or bottom. If you are using a carbon filter for odor control, the standard arrangement is filter inside the tent, then fan, then duct to the discharge point. That keeps the tent under negative pressure and scrubs odor before air leaves the enclosure.
Keep ductwork short and straight. Every unnecessary bend reduces performance. Flexible duct that is crushed, sagging, or sharply turned can cut airflow far more than most growers expect. If the fan sounds like it is working hard but the tent remains warm, duct resistance is one of the first things to inspect.
Passive intake vs. active intake
Passive intake works by opening lower tent vents and letting the exhaust fan pull fresh air in. This is simple and effective for many setups, provided the intake openings are large enough. As a general principle, passive intake area should exceed exhaust duct area so the fan is not fighting to pull replacement air.
Active intake uses a separate fan to push air into the tent. This makes sense when intake air must travel through ducting, when the surrounding room has poor air availability, or when a larger tent creates too much restriction for passive openings alone. The trade-off is complexity. If intake airflow is too strong, it can reduce negative pressure and compromise odor containment.
For most odor-sensitive grows, slight negative pressure is the target. The tent walls should pull inward a bit, which shows the exhaust side is in control.
Internal circulation is not optional
If you are serious about plant health, do not stop at exhaust and intake. Internal circulation fans are what keep microclimates from forming around leaves and buds. Without them, humidity can stay trapped in the canopy even when the room-level RH reading looks acceptable.
Place circulation fans so they move air across and under the canopy rather than blasting one spot continuously. Leaves should flutter slightly, not fold over from wind stress. In dense canopies, one fan rarely handles the whole tent. Upper and lower airflow patterns both matter.
Good circulation supports stem strength, helps temperature equalize, and reduces the risk of mold and mildew in flower. It also makes your exhaust system more effective because heat and moisture are less likely to stay trapped in dead zones.
Temperature, humidity, and the room outside the tent
One of the biggest ventilation mistakes is ignoring the room the tent sits in. A grow tent cannot cool below the temperature of the air being pulled into it unless you are actively conditioning that intake air. If the lung room is already hot and humid, the tent will inherit those problems.
That means successful grow tent ventilation often starts outside the tent. The surrounding room may need better cooling, dehumidification, or its own ventilation path. This is especially true in garages, sheds, attics, or sealed interior rooms where ambient conditions drift well above target.
LED lighting has reduced heat loads compared to older HID systems, but LEDs still generate heat, and drivers mounted inside the tent add to it. Dehumidifiers also produce heat. Pumps, CO2 equipment, and even densely packed plant mass change the ventilation requirement over time. Early vegetative growth and late flower do not behave the same way.
Carbon filters and odor control
If odor control matters, the carbon filter must be matched to the fan's real operating range. An undersized filter can restrict airflow or fail to scrub odors effectively. An oversized fan running too hard through a mismatched filter can reduce contact time and lower filtration efficiency.
Filters also lose performance as they load with contaminants. If odor starts escaping despite the tent staying under negative pressure, check for filter age, air leaks at joints, and bypass caused by poor clamping or torn pre-filters.
Seal connections carefully. Even a strong fan and quality filter will underperform if duct joints leak before the air reaches the carbon bed.
Common mistakes when learning how to ventilate a grow tent
The first mistake is buying a fan by duct diameter alone. A 6-inch fan is not automatically enough just because the flange fits the tent port. Delivered CFM at pressure is the real number.
The second is running too much duct. Long runs with several 90-degree turns make a fan work far harder than a straight shot through the wall or ceiling.
The third is treating temperature as the only metric. In many grows, humidity control becomes the harder problem once the canopy fills in. A tent can read acceptable temperature and still be operating in a disease-prone humidity range.
The fourth is ignoring maintenance. Dust buildup on fan blades, clogged filter wraps, and loose duct connections quietly reduce system performance over time.
A practical ventilation target for most growers
If you want a workable benchmark, aim for a tent that maintains steady negative pressure, exchanges air regularly, and keeps canopy temperature and humidity stable with lights on and off. Fan speed controllers are useful because the correct setting changes with season, plant stage, and the conditions in the intake room.
Oversizing slightly and controlling down is usually better than choosing a fan with no reserve capacity. That extra margin helps when filters age, summer temperatures rise, or you expand the system later.
For technically demanding cultivation spaces, it helps to think beyond the tent itself. The tent, fan, filter, ducting, intake source, and surrounding room are one mechanical system. When those components are matched properly, the result is not just lower heat. It is better plant consistency, tighter odor control, and fewer surprises during late flower.
Factory Fans Direct works with growers and facility operators who need ventilation sized to real operating conditions, not guesswork. If your tent or cultivation room is running hot, humid, or odor-heavy, a proper airflow review can save time, equipment cost, and crop risk.
A well-ventilated grow tent should feel controlled, not forced. When airflow is engineered around actual heat load and resistance, your plants stop fighting the room and get back to growing.
Factory Fans Direct - Greenhouse, Cannabis & Hemp Ventilation & Cooling Experts | Contact Mike Miller VP Engineering at Factory Fans Direct for a FREE Project Evaluation 888-849-1233 | Mike@FactoryFansDirect.com
Recent Posts
-

Smart Buildings Architects Recommend Edmonds ecoPOWER Hybrid Ventilation
A rooftop ventilator should not force an all-or-nothing energy decision. Smart Buildings Architects …7th Sep 2026 -
Smart Industrial Buildings Use Edmonds ecoPOWER Hybrid Ventilation
A roof exhaust system can be the difference between a plant that controls heat at the source and one …7th Sep 2026 -
Smart Commercial Buildings Use Edmonds Hybrid Ventilation
A rooftop exhaust fan that only performs when the wind blows is not a complete ventilation strategy. …7th Sep 2026